Thursday, August 11, 2011

Chalk It Up

This project has been such a big hit in our house.  I love it because it was easy, hubby loves it because it was cheap, and kids love it because it's so much fun!  Actually, this is such an easy DIY project, you could probably figure it out just from photos alone.  

I love the look of chalkboards in the kitchen.  I have seen them on islands, refrigerators, pantry doors, you name it.  They are so stinkin cute and so functional!
I am not normally a huge fan of having the chalkboard paint applied directly to the wall.  Except in this example, because it looks amazing!
I really wanted one for the kids to use, so I wanted it to be big enough for all of them to use at once and I wanted it hung low enough for them to comfortably reach.  I thought it would be a great place to color, or practice spelling words, etc. 
I love seeing it in a chunky frame or a painted serving piece, something 3 dimensional and unexpected.  I was browsing through my favorite spot - the 90% off aisle at Hobby Lobby - and found big, chunky frames for 90% off!  They have them there quite a bit, often times a customer will order a custom frame and it doesn't work out for one reason or another so HobLob will mark them way down since the odd size is hard to resell. 
I knew I wanted one for a breakfast bar area between our kitchen and family room, it's really too narrow for bar stools so it's been a big empty space, making it the perfect home for a framed chalkboard.  I found a chunky, gold, ornate frame, the biggest one I could find to fill that space.  The one I chose was originally $280 marked down to $28!  Next stop was Lowe's, I was able to find a smooth, thin piece of plywood and they will cut it for you to the exact size you specify. The frames are marked with the size of the opening, not the size of the entire frame.  So my frame opening was 31" x 40.5", and their cuts are so exact, it fit like a glove.  Particle board or plywood or something similar will not work because the wood will start to splinter as it gets used and erased numerous times, ask me how I know!  So, on my second trip to Lowe's I purchased a piece of hardboard, it's the dark brown stuff used to make pegboards but it is completely smooth with no holes in it, it was about $9.  The piece I chose is actually dry erase material on the opposite side so when I get sick of all the chalk dust I can flip it around and they can color with dry erase markers instead.

Getting the chalkboard surface was just a simple can of spray paint, $8 at Hobby Lobby.  It is also available as a brush on paint, but that takes more effort.  Next, I stapled it into place in the frame inset.  I was trying to use what I had on hand and my staples were not long enough to go all the way through the hardboard and into the frame, so I stapled them perpendicular to the edge of the frame.  You can see in the picture that one prong of the staple is in the frame and the other prong is in the hardboard, I just put about a million of those suckers in and I'm confident it's not going anywhere, even if the kids are coloring too hard.  I hung 2 heavy duty picture hooks on the wall and added 2 D-hooks to the frame itself and it was ready to install.
Next, you have to "season" the chalkboard.  Just rub the side of a piece of chalk all over the board and cover it thoroughly, then erase.  Skipping this step will leave your little artists first masterpieces permanently etched on the chalkboard.  
I am thrilled with the finished product!  It took a few hours of my time (most of which was waiting for the paint to dry) and $45.  I think it looks great in the space and is also a fun, functional item that has a big impact on the room.


Saturday, June 25, 2011

Gussied Up Guest Bedroom

The guest room at my mom's house has been in need of a redo for a while now.  It has always been a bit of a hodge podge - a catch all for the stuff that each of us kids have left behind when we flew the coop; and a landing zone for mis-matched furniture that didn't have a home anywhere else in the house.  Mom knows that I am usually itching for a project, so we decided now was a good time to bring the kiddos to hang out with Grandma and I could tackle the guest bedroom.
Here it is before I got started.  As you can see it really needed some help.  First I de-cluttered and hauled some stuff to the garage.  Mom's main goal was to reuse what she already had and try not to spend much on new things to clutter up the room.  I decided that I would tackle the dark furniture and paint it so that it looked more like a set. I have been a fan of Perfectly Imperfect Blog for a while now and she just raves about Annie Sloan Chalk Paint.  Her furniture redo's are beautiful and her tutorials and videos are extremely helpful.  I found a local supplier, Wonder Faux Studio, if you are in the Houston area, they were really great! The staff was so helpful and they have many pieces to show you using the different colors and waxes, it was a big help as I decided what direction I wanted to go with this project. They offer classes and workshops that teach techniques using the chalk paint and other popular faux products.
The thing about chalk paint that drew my attention was that you don't have to prep your surface before you paint it.  I don't necessarily have the patience to sand, strip, or prime any furniture.  That being said, these tables were rough! Mom has had them for years and they have nicks and scrapes and water stains.  The chalk paint covered those blemishes right up!
The headboard had seen better days as well.  It is actually something that Mom found almost 20 years ago while "junking" in Germany.  It was dark as well and had a few rough patches, and was an oak veneer so I didn't feel guilty painting it.  It was actually a king size headboard made out of two pieces that joined in the middle, we were able to trim it down on the outside edges to properly fit the queen size bed. I can't believe I forgot to take a before picture of the headboard, but you can see the back side of it in the photo and it was just your typical boring oak but it did have a pretty beveled edge with a small scroll design along the top.
So, time to get to work, I dusted it all off and got it prepped for painting.  I decided on Old White Chalk Paint with clear wax.  The first coat went on pretty thick and the tutorials that I watched said that the paint is made to thicken up to add a hand painted texture to your furniture.  I think I wasted a lot of paint on the first coat though, it just didn't need such a thick coat since it offers such good coverage.  On the second coat, I added a little water and it went on so much more smoothly.  Pictured below are the tables after one coat of paint.  They were very streaky and uneven but smoothed out perfectly after the second coat. 
Next, I decided to distress the tables and headboard.  I knew I wasn't going for a real Shabby Chic look but I did want to add a little more interest to the pieces.  They have pretty, curved legs and some carved details on the front so I decided to take a little paint off the edges, nothing even, just hit the edges and details sporadically with a fine sanding block.  I was amazed at how easily the paint comes off when sanded.  
The waxing process was the hardest part.  It was a little intimidating and I will see how my wax job holds up and possibly add another layer later.  I applied one coat of wax to the legs and drawers of the tables and 2 coats to the top.  The headboard got one coat of wax.  I watched videos online to see how it's done.  I recommend you watch Shaunna's video and she will also recommend you watch Miss Mustard Seed's tutorial.  I decided not to use the dark wax like they are fond of, it was just too intimidating and it wasn't really the look I was going for in this space.  I do hope to mess around with it soon though and practice with the dark wax.
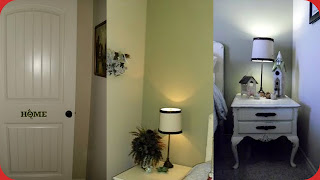
Lastly, I put it all together and accessorized! I found the lamps and drawer hardware on clearance at Hobby Lobby.  Mom has had the bedding for a while but we added new throw pillows from HomeGoods (pretty sure I couldn't live without that place) and cream sheets and a bedskirt from Target.  Mom had the birdhouses and small ceramic birds outside on the patio and I stole those for the room (first I had to make her kill the wasps that had made themselves at home inside).  The flowers above the bed are from Bombay Kids and used to be in Mom's library.  I am still on the lookout for some type of bird art for the left side of the bed.  The "Dream" expression and the "Home" sign on the door came from here
Ta Da - the finished product!  Emma decided to model the room for us!
I hope she enjoys the space and that her guests will be comfortable there.  I know I will enjoy sleeping in this new, bright, cheerful, uncluttered room when I come to visit!


Monday, June 6, 2011

Beautiful and Refreshing

Ryan and I have been taking care of yard work lately, nothing fancy just cleaning up the backyard, hauling out bag after bag of weeds.  That always gets me daydreaming of the perfect yard.  Our landscaping will probably never live up to the image I have in my head but Ry did do a great job tidying up back there!

Then today, the kids and I spent the morning at soccer practice and then headed to the gym.  it was a sweaty, nasty, Houston morning! We came home wishing we could dive into a clear, cold pool.  This one will do:
This is a home for sale in Carlton Woods.  I dream Big!
This looks like so much fun,
The Shamrock Hilton was an old Houston landmark that has since been demolished.  They had a sychronized swimming team called the Corkettes.  I love their suits! I tried to buy my girls the vintage swimsuit that Janie and Jack carried this Spring but, sadly, they refused to wear it.
Don't you just love this amazing deck and pool in Rock Creek,
Again, it won't fit in my yard or in my budget but that iron dome is stunning.
I don't know where this pool is located, but it reminds me of the movie Stealing Home with Jodie Foster and Mark Harman.  They sneak onto this property and dive down to the bottom of the pool to touch the dark, slimy drain.  I've probably watched that movie a hundred times.

Back to the real world, this was how we cooled off instead:
Could they get any cuter? I'd give up any of those other yards to hang out in the blow up pool with these three any day.

Monday, May 23, 2011

Trying...

To figure this thing out! Lol I am definitely not a techy person.  But I have discovered a massive amount of blogs to follow and inspire me!  And even more importantly I have discovered Pinterest!  I can't even begin to tell you how much fun this site is!  First of all, they are geniuses and made it Invitation Only.  Don't you feel more important when access is exclusive! I love it because I always have so many ideas swimming around in my head and Pinterest is my new Card Catalog.  Once you join, you will download the bookmarklet and "Pin" away.  As I visit websites and see ideas that inspire me I will "Pin it" from my toolbar and that will file that image on an inspiration board.  So, since I am always on the look out for ideas to use in my daughter's room, or flooring choices, or new sofas, or the gallery wall I haven't gotten around to yet, I can use Pinterest to keep a running tally of all these notions that float around my head and they are conveniently stored for me to add to or change or reference later when I am ready to get started on a project.  The website information for each image is also stored so I also have access to my sources for all these pretty things! Below you will find a couple boards that I have created.  I will warn you: It's Addicting! And the possibilities are endless.  Pinterest is not just for interior design.  I have a board for blogs I follow in one convenient location, you can catalog recipe ideas, craft or scrapbook project ideas, wardrobe ideas... total time suck but worth it!
This is an Inspiration Board for Little A's room.  We've been working on this room for a while now.  I thought I was done but then she informed me that she wanted her room to look like a dress shop.  I avoided a theme overkill but she really does enjoy fashion designing and I want to give her a space that will inspire that creativity.
This is my "Swooning" Inspiration Board.  I Pin images as I come across them and then when I have my Someday House I will have all these beautiful ideas to look through and try to incorporate into the house.
And finally, here is my next project, my sister Michelle's bedroom in her loft needs a redo and we are playing with the idea of wrinkled, ruffled linen in shades of turquoise and tans.

This is a really helpful video tutorial that will help you understand Pinterest a little better.
If you'd like to see more of my Inspiration Boards or start some Pinning of your own you can go to Pinterest and request to join or shoot me a message and I will invite you.

Thursday, April 28, 2011

Share the love!

So I've started a blog... I may be the only one reading these ramblings but I do find it therapeutic!  If you know me, then you know I love to be creative.  That doesn't mean that I am creative enough to completely come up with an idea from scratch and execute the idea.  I am on a good day, but usually I will see something that inspires me and I can study how it's made or how it's painted or how it can be repurposed and decide how I will take that idea and change it and make it work in my space.  If I cannot come up with a way to do it myself or if it is too extraordinary to even attempt a DIY, then I will come up with the money to buy it!
There is a wealth of knowledge and creative talent out there and I could spend hours every day reading other blogs and drooling over other projects - I could do that if I didn't have a little one popping out of bed for the upteenth time, or another short person asking me for yet another snack, another story, another push on the swing... another fill in the blank.  I love the generous attitude of design bloggers so much.  They are so proud of what they have done, they seem to love sharing their inspiration with others.  They get that there are other women like themselves out there who have an eye for design, can't hire someone to do it for them, and probably want the creative outlet and want to create something for themselves that they can be proud of.  My biggest pet peeve over the years has been when you meet someone that is obviously very talented, very creative, has created some beautiful things and you try to get to know them a little and they clam up.  I want to be like "Listen lady! I think what you've done is amazing! I'm not trying to steal your idea, steal your client, whatever..I'm trying to compliment what you've done."  That is someone who is up on their High Horse all right, but I want them to be up there with a spirit of thanksgiving, with the attitude that God gave them a talent, whatever it may be, and they are grateful for that and appreciative that it is liked by others.  That doesn't mean you are giving away your talent for free, just acknowledging that you didn't get there all by yourself.
So that's what I hope to do.  Share whatever little nuggets I find or come up with and hope that you can use them to your advantage, to make your home -  no matter how big or small, clean or dirty, new or old -  a home you love.